
BC’s New Zoning Rules Explained: What You Can Actually Build on Your Lot Now

Construction Insights

BC’s New Zoning Rules Explained: What You Can Actually Build on Your Lot Now

Since the province passed Bill 44 in late 2023, most single-family lots in BC’s larger urban areas, Surrey, Burnaby, and Vancouver included, are no longer restricted to just one home. The rules are collectively known as Small-Scale Multi-Unit Housing (SSMUH), and they set a province-wide minimum for how much density a municipality has to allow, even if the local zoning map still says “single-family.” That’s a real opportunity for homeowners sitting on an ordinary lot, but the actual number of units you can build depends on specifics that are easy to get wrong from a quick search. Here’s how it actually breaks down.

What the province actually requires

SSMUH applies to municipalities with more than 5,000 people, which covers Surrey, Burnaby, Vancouver, and most of Metro Vancouver. It sets a floor, not a ceiling: cities can allow more density than the province requires, but they can’t zone a qualifying single-family lot down to one unit anymore. The baseline looks like this:

Lot size / location Minimum units the city must allow
Under 280 m² 3 units
280 m² or larger 4 units
280 m²+, within 400m of a frequent transit stop 6 units

“Frequent transit” has a specific meaning here: a bus or SkyTrain stop with service roughly every 15 minutes through most of the day, not just any bus route. That distinction is exactly why two lots that look identical from the street can qualify for very different unit counts.

Parking rules changed too, and this is the part people miss

The real unlock isn’t the unit count, it’s the parking. In a qualifying 6-unit zone near frequent transit, a municipality can’t require any on-site parking at all. For 3- and 4-unit lots outside those areas, cities are directed toward little or no minimum parking as well. Since parking has traditionally been what made or broke a multiplex’s economics on a smaller lot, this is often the change that decides whether a project actually pencils out.

What still depends on your specific lot and city

The province sets the minimum, but each municipality has been rolling its own bylaws, design guidelines, and application processes out on its own timeline, and Surrey, Burnaby, and Vancouver don’t all handle the details the same way. Before assuming a number, it’s worth confirming:

  • Whether your lot actually falls within the urban containment boundary the rules apply inside, generally not to larger rural or acreage-style properties.
  • Whether you’re inside a designated frequent transit area a few hundred metres can be the difference between a 4-unit and a 6-unit allowance.
  • What your city’s own design guidelines require setbacks, height, and site coverage rules still apply on top of the unit count, and they vary by municipality.
  • Whether services can support it sewer, water, and drainage capacity are checked at the application stage, and older infrastructure in some neighbourhoods can limit what’s realistic even where zoning allows more.
  • Any existing restrictive covenants these can still override the new zoning on a specific title.

We covered how to weigh unit count once you know what’s allowed in our duplex vs. multiplex breakdown, this article is really about the step before that: confirming what your lot is actually entitled to build in the first place.

Why this is worth checking before you commission a design

We’ve seen homeowners come to us with a design already sketched around an assumed unit count, only to find their specific lot qualifies for fewer units than they’d planned, or more than they realized. Either way, that’s a conversation worth having before money goes into drawings, not after. A short zoning and site review upfront, checking lot size, transit proximity, service capacity, and your municipality’s current bylaw, tells you what’s actually realistic for your property before you commit to a design direction.

Not sure what your lot in Surrey, Burnaby, or Vancouver actually qualifies for under the new rules?
Talk to Xerox Builders

Construction Management vs. General Contracting: Which Do You Actually Need?

Construction Insights

Construction Management vs. General Contracting: Which Do You Actually Need?

Homeowners and investors planning a build often use “construction management” and “general contracting” interchangeably, then get surprised partway through a project when the contract, the billing, and who actually holds the risk don’t work the way they assumed. Both services get your home built. The difference is in who’s legally on the hook for what, how you pay, and how much day-to-day control you keep.

What general contracting actually means

In a general contracting arrangement, we take on a single fixed (or largely fixed) contract to deliver the finished project. We hire and manage every trade, carry the schedule and quality risk, and you have one point of contact and one overall price for the scope agreed upon. If a subtrade runs into a problem or a material costs more than expected, that risk sits with the contractor, not with you, within the terms of the contract.

What construction management actually means

With construction management, the structure flips. You, the owner, hold the trade contracts directly, and we act as the coordinator and advisor: managing the schedule, sequencing trades, tracking budget against actual invoices, and flagging issues before they become expensive ones. You see exactly what every trade and supplier is charging, because you’re the one paying them, with construction management fees charged separately for that coordination work.

The core difference in one line: General contracting transfers risk and cost certainty to the contractor for a set price. Construction management keeps you closer to the actual costs and decisions, in exchange for taking on more of that risk yourself.

How cost and payment structure differ

  • General contracting is typically quoted as a lump sum or fixed price for the agreed scope, so your number is set early and changes are handled through a formal change-order process.
  • Construction management is typically billed as a management fee (flat or percentage-based) on top of the actual, transparent cost of labour and materials, so your final number tracks real costs rather than a pre-set estimate.
  • Change flexibility tends to be easier under construction management, since you’re not renegotiating a fixed contract every time you want to adjust a finish or a layout detail.
  • Cost predictability tends to favour general contracting, since the price is locked in before construction starts, assuming the scope doesn’t change.

Which one actually fits your project

General contracting tends to suit owners who want a single accountable party, a clear number to plan around, and minimal week-to-week involvement in trade coordination. It’s a common fit for a well-defined custom home or a duplex or multiplex project where the scope is settled before construction begins.

Construction management tends to suit owners or investors who want visibility into real costs, plan to make design decisions as the project progresses, or are experienced enough to be comfortable holding trade contracts directly. It’s also common on larger or more complex builds where cost transparency matters more than a single locked-in number.

It isn’t always all-or-nothing: Some projects start under construction management during design and early planning, then move to a general contracting arrangement once the scope is finalized. The right structure depends on how settled your plans are and how involved you want to stay.

Talk it through before you commit to either

Neither structure is inherently better; they’re built for different priorities. The most useful first step is a conversation about your project’s scope, your timeline, and how much day-to-day involvement you actually want, so we can recommend the structure that fits rather than defaulting to one.

Not sure which structure fits your project? Let’s walk through your scope together.

Talk to Xerox Builders

Duplex vs. Multiplex: Which Makes Sense for Your Vancouver or Burnaby Lot?

Construction Insights

Duplex vs. Multiplex: Which Makes Sense for Your Vancouver or Burnaby Lot?

Zoning changes across British Columbia have opened up options that simply didn’t exist on most single-family lots a few years ago. Where a property once allowed only one home, many now qualify for a duplex, triplex, or fourplex. That’s an opportunity, but it also means homeowners now have to weigh a decision that didn’t used to exist: how many units actually makes sense for this specific lot?

What changes as unit count goes up

Adding units isn’t simply a matter of dividing the same building into more pieces. Each additional unit brings its own requirements:

  • Parking and access — More units typically means more parking to plan for, and site layout has to accommodate access without eating into usable yard space.
  • Fire separation between units — Every unit boundary is a wall or floor assembly that has to meet fire separation standards, which affects framing, drywall layers, and where penetrations like outlets and plumbing can be placed. We go into this in detail in our fire separation guide.
  • Shared vs. separate systems — More units raises the question of whether mechanical systems, water service, and electrical panels are shared or independent, which has cost and long-term management implications.
  • Construction sequencing — A fourplex is a meaningfully more complex build to sequence and coordinate than a duplex, even on the same size lot.

Duplex: the straightforward option

A duplex is often the most direct path for homeowners who want additional value from their lot without taking on the full complexity of a multi-unit project. It typically involves the simplest permitting path of the multi-unit options, one shared fire separation wall to design around rather than several, and a construction sequence closer to a standard custom home. For a self-owned lot where the goal is to create a second unit to rent, house family, or eventually sell separately, a duplex is frequently the practical starting point.

Triplex and fourplex: more units, more to coordinate

Triplex and fourplex projects make sense when a lot’s size, location, and zoning genuinely support the additional density, and when the goal is maximizing long-term return from the property rather than a single additional unit. These projects involve more fire separation assemblies, more parking planning, and more coordination between trades, consultants, and the municipality. They’re not simply “bigger duplexes”; the project management requirements step up meaningfully with each additional unit.

The question worth asking first: Before deciding on unit count, it’s worth confirming what your specific lot’s zoning actually permits, what parking and setback requirements apply, and what your realistic budget supports. A design that looks good on paper for four units can lose its financial logic once real site constraints and construction costs are factored in.

What tends to drive the right answer

  • Your goal for the property — Long-term rental income, housing for family, or maximizing resale value after construction each point toward different unit counts.
  • Lot size and shape — Some lots comfortably support a fourplex; others make more sense as a duplex once parking and setbacks are accounted for.
  • Budget and financing — More units means more upfront cost and a longer, more complex build, which needs to align with how the project will be financed.
  • Municipality — Vancouver, Burnaby, Surrey, and Delta each apply their own specific zoning and permitting requirements, so what’s straightforward in one city may involve more steps in another.

There isn’t a universally “right” unit count. There’s a right count for your specific lot, budget, and goals, and that’s usually clearest after a proper site review rather than a general comparison.

Weighing a duplex, triplex, or fourplex for your property in Vancouver, Burnaby, Surrey, or Delta?

Talk to Xerox Builders

Laneway House Cost in Vancouver: What Actually Drives Your Budget

Construction Insights

Laneway House Cost in Vancouver: What Actually Drives Your Budget

Ask five different homeowners what their laneway house cost, and you’ll likely get five very different answers. That’s not because contractors are inconsistent; it’s because a laneway house is really a small custom home, and small custom homes are shaped by dozens of site-specific decisions that add up quickly. Rather than lead with a single number that won’t match your lot, it’s more useful to understand what actually moves your budget up or down.

Why laneway house pricing varies so much

Two laneway houses of the same square footage, on similar lots, can land at noticeably different price points once you account for finishes, mechanical systems, and site conditions. The building itself is only part of the equation; what’s underneath, beside, and around it often matters just as much.

The site conditions that drive cost before construction even starts

  • Lane access and grading — A lane that’s narrow, sloped, or hard for equipment to reach adds time and cost to excavation, foundation work, and material delivery.
  • Existing utilities — Running new water, sewer, gas, and electrical service to a separate structure at the back of the property is rarely a small line item, especially if the main house’s utilities weren’t designed with a second structure in mind.
  • Tree protection and setbacks — Mature trees near the building envelope can trigger protection requirements or design adjustments that affect the footprint you’re allowed to build.
  • Soil conditions — Foundation type and depth depend on what’s actually in the ground, which is only confirmed once geotechnical work is done.
Why this matters early: Most of these factors are invisible until a site review or geotechnical report is done, which is exactly why a laneway house quoted from a floor plan alone, without a site visit, should be treated as a starting point rather than a final number.

Design and finish decisions that move the number

Beyond the site, your own choices carry real weight in the final cost:

  • Square footage and layout complexity — A simple rectangular footprint is more cost-efficient per square foot than a laneway house with multiple rooflines, jogs, or a two-storey design with a complex stair.
  • Finishing level — Cabinetry, flooring, tile, and fixtures can vary widely in cost while looking similar at a glance; this is usually where budgets shift the most after the initial framing stage.
  • Mechanical systems — Standard forced-air heating versus a heat pump system, or a basic electrical panel versus one sized for future EV charging, each carry different upfront costs and different long-term operating costs.
  • Energy performance target — Meeting a higher BC Step Code level than the minimum required adds cost to insulation, windows, and airtightness detailing, but can meaningfully reduce long-term utility bills.

Permitting and timeline factors

A laneway house also has to work within your municipality’s specific zoning and permitting process, and timelines and requirements differ across Vancouver, Burnaby, Surrey, and Delta. Delays during permitting don’t just push your move-in date back; they can affect cost too, particularly if material pricing shifts between when a project is quoted and when it actually breaks ground.

A note on secondary suites and fire separation: If your laneway house will share fire separation requirements with the principal residence, that detail affects wall assembly and framing decisions from the design stage onward. We’ve covered what that involves in more depth in our article on fire separation.

How to get a number you can actually plan around

The most reliable way to budget for a laneway house is a site-specific conversation: your lot, your lane access, your utility situation, and what you actually want the finished space to do, whether that’s a rental suite, space for family, or a home office. A generic per-square-foot number can’t account for any of that, which is why we walk every laneway house inquiry through a proper site and scope discussion before putting a number in front of a client.

Considering a laneway house on your Vancouver, Burnaby, Surrey, or Delta property and want a realistic sense of cost for your specific lot?

Talk to Xerox Builders

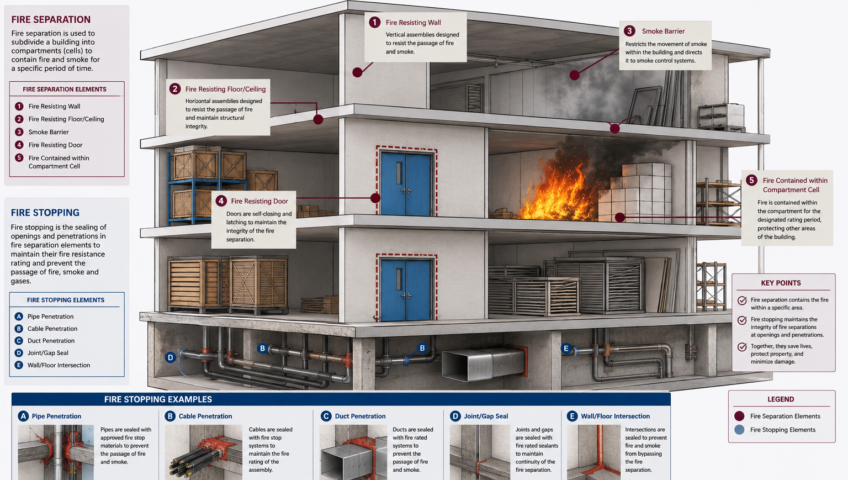
Diagram illustrating fire separation and fire stopping in a wall assembly

Fire Stopping and Fire Separation: What Vancouver’s Building Code Actually Requires

Construction Insights

Fire Stopping and Fire Separation: What Vancouver’s Building Code Actually Requires

Fire separation and fire stopping are often talked about as one thing, but they’re two different systems working together. A fire separation is the wall or floor assembly itself. Fire stopping is what protects that assembly at the exact points where it gets interrupted, by a pipe, a cable, a duct, or any other penetration passing through it. Get the wall right and leave one penetration unsealed, and the whole assembly’s rating can be compromised at that single point.

Fire separation: the assembly

As covered in our earlier article on fire separation, a fire separation is a wall, floor, or ceiling built to resist fire spread for a defined period, commonly 45 minutes or 1 hour in residential construction. It relies on fire-rated drywall (Type X gypsum), proper framing methods, and insulation within the cavity.

Fire stopping: sealing the gaps

Every fire separation eventually has something passing through it. A plumbing stack, an electrical cable, an HVAC duct, a gas line. Each of these penetrations creates a gap in the rated assembly, and without proper fire stopping, that gap becomes the path of least resistance for fire and smoke.

Fire stopping systems are specifically tested and rated to restore the fire-resistance rating of the assembly at the penetration point. Common methods include:

  • Fire-rated caulking and sealants — applied around small penetrations like electrical cables and low-voltage wiring
  • Intumescent wrap strips — materials that expand when heated, closing the gap around plastic pipes as they melt in a fire
  • Fire stop collars — mechanical devices installed around plastic plumbing pipes that clamp shut under heat
  • Fire stop pillows and bags — used around larger or irregular openings, such as bundled cable penetrations
  • Fire-rated foam and mortar — used for larger gaps around ducts or structural penetrations
Why this matters more than it sounds like it should: A fire separation is only ever as good as its weakest point. An inspector who signs off on a beautifully built fire-rated wall will still fail it if a single unsealed cable penetration is found. The assembly and the penetrations through it are inspected as one system, not two.

The code behind it: BC Building Code vs. Vancouver’s own by-law

Most of British Columbia builds under the BC Building Code (BCBC), the provincial code that governs construction throughout most municipalities. Fire separation and fire stopping requirements for residential construction fall under Part 9 of the code, which addresses housing and small buildings, with fire protection requirements specifically addressed in Section 9.10.

The City of Vancouver is the exception. Under the Vancouver Charter, the city has the authority to enact its own building regulations rather than following the provincial code directly. This is why Vancouver operates under the Vancouver Building By-law (VBBL) rather than the BCBC used elsewhere in the province.

In practice, the VBBL has often moved ahead of the provincial code on specific requirements, sometimes adopting more stringent energy and safety provisions before they became standard elsewhere in BC. Because code editions and specific clause numbers are amended periodically, and because Vancouver’s requirements can differ in ways that matter for your specific project, the right numbered reference should always be confirmed with a code consultant or the City of Vancouver’s building department at the time of permit application, rather than relied on from an article like this one.

What this means for a real project

If your project is in Vancouver specifically, your fire separation and fire stopping requirements are reviewed against the VBBL, not the BCBC that applies in Burnaby, Surrey, or Delta. The underlying principles, rated assemblies and sealed penetrations, are consistent across both codes, but specific requirements, acceptable materials, and inspection sequencing can differ by jurisdiction. This is one of several reasons a code consultant familiar with the specific municipality is worth involving early, rather than assuming a detail that worked on a project in one city will pass the same way in another.

Building in Vancouver, Burnaby, Surrey, or Delta and want to understand what fire separation and fire stopping mean for your specific project and municipality?

Talk to Xerox Builders

Fire Separation: Why It Matters and Where It’s Required

Construction Insights

Fire Separation: Why It Matters and Where It’s Required

Fire separation is one of the most important safety systems in a home, and also one of the least visible. Once walls are closed up and finishes are installed, most of it disappears from view entirely. But the assemblies behind that drywall are doing real work: slowing the spread of fire and smoke long enough to give occupants time to get out safely, and firefighters time to respond.

What fire separation actually is

A fire separation is a wall, floor, or ceiling assembly specifically designed and constructed to resist the spread of fire for a defined period of time, usually measured in minutes (45 minutes, 1 hour, or longer, depending on the application). This isn’t about making something fireproof; it’s about slowing fire down long enough for safe evacuation and emergency response.

These assemblies typically rely on a combination of fire-rated drywall (commonly Type X gypsum board), specific framing methods, and carefully sealed joints and penetrations. A fire separation is only as good as its weakest point, which is why the details matter as much as the materials.

Where fire separation is required

Requirements vary by project type and municipality, but the most common applications in residential construction include:

  • Between dwelling units — In duplexes, triplexes, and multiplexes, the wall (and often floor/ceiling assembly) separating one unit from another is almost always required to be a fire separation, since a fire in one unit should not spread freely into a neighbouring one.
  • Between a garage and living space — An attached garage is considered a higher fire-risk area due to vehicles, fuel, and stored materials, so the wall and ceiling separating it from living space typically require fire separation.
  • Around secondary suites and laneway homes — Where a secondary suite shares a structure with the principal residence, the separating assembly is generally required to meet fire separation standards, similar to multi-unit construction.
  • Around mechanical rooms and furnace areas — Rooms containing fuel-fired equipment often require fire-rated separation from adjacent living space.
  • Exit corridors and stairwells in multi-family buildings — Paths of egress are frequently required to be protected so they remain usable during a fire event.
Why this matters for duplexes and multiplexes specifically: With BC’s recent zoning changes now permitting more duplexes, triplexes, and fourplexes on standard lots, fire separation between units has become a detail worth understanding early. It affects wall assembly thickness, where certain penetrations (electrical, plumbing) can and can’t be placed, and how walls are framed and finished, all of which should be planned for at the design stage rather than discovered during construction.

What actually goes into a fire-rated wall or floor

A typical fire-rated wall assembly between two dwelling units might include:

  • Two layers of Type X gypsum board on one or both sides of the wall
  • Fire-rated insulation within the wall cavity
  • Careful sealing of any penetrations, such as electrical outlets, plumbing lines, or ductwork passing through the wall
  • Fire-rated caulking or sealant at the top and bottom of the wall where it meets the floor and ceiling

Floor and ceiling assemblies between units follow similar principles, often combining fire-rated drywall on the ceiling side with specific subfloor and insulation requirements.

Why this shouldn’t be an afterthought

Fire separation requirements affect real design decisions, including wall thickness, where outlets and switches can be placed, how HVAC ducting is routed, and how much usable floor area a unit actually has once the required assemblies are accounted for. Planning for these requirements at the design stage, rather than during framing or drywall, avoids costly rework and keeps a project moving on schedule.

Planning a duplex, multiplex, or laneway home and want to understand what fire separation means for your specific project?

Talk to Xerox Builders